
Are you a Chrome user trying to setup vCloud Director 9.x and you want to have the nice “Secure” https:// in your browser’s address bar? If so, please read on.
Background

The folks the develop the Chrome browser updated it a while back to turn the address bar Red and show as Not secure if the site’s SSL certificate did not include a Subject Alternative Name, commonly referred to as SAN. That might not sound like much to the average reader, but this can present a bit of an issue in a corporate environment where security is top of mind. Seeing such a thing for your corporate websites can be discerning to say the least.
The problem here is that many instruction guides, documentation, built-in tools, and blog posts simply don’t include SAN generation as part of the Certificate Signing Request (CSR) process. Instead, the focus is nearly always on making sure that the Common Name in the CSR matches the Fully Qualified Domain Name (FQDN) of the server that the certificate is being requested for. That Common Name matching the FQDN is very important as it shows that the Cert is for the particular website you are visiting, while SANs have traditionally been more for “Alternative” names that may be using the same SSL Certificate.
Why I’m Writing This
So what prompted me to write this article now? Well, vCloud Director of course! We want that in the new lab environment we’ll be using for classes and, like all other things in that environment, we want the address bar to show as Secure.
You know how “official” documentation can be lacking in certain areas – I’ll leave it at that… I don’t Manage a busy Certificate Authority and issue SSL Certs on a daily, weekly, or even monthly basis – more like once or twice a year, as needed. So, when I do need to create a new certificate for something, I typically rely on a handy PowerShell Module that Doug Baer wrote for the VMware Hands On Labs captains. The script is quite nice as it will auto-generate CSR, PEM, CER, PFX, KEY, etc… files for the FQDN and IP address you specify. The module makes calls to the specified CA, in this case it is the lab “Control Center” that acts as the Certificate Authority, and outputs all the required files in a folder. This is Great !! for products that allow you to simply upload a PEM file, or copy/paste the .crt/.cer and .key files… but vCloud Director and some other products/servers don’t do that. Instead, they store certificate information in a keystore.
Instructions
The lab environment this is being done in consists of the following (only listing relevant items):
- Windows Server 2012 R2
- Certificate Authority, DNS, Domain Controller
- PowerShell 5.1
- vCloud Director 9.5.0.1 GA
- Running on CentOS 7
- Single Cell
Make it easier to run keytool on vCloud Director server
vCloud Director includes keytool the primary tool we use on the server for doing the necessary things like:
- Create a keystore
- Create a CSR
- Create Self Signed Certificates (not doing that here, just pointing out the capability)
- Import Root, Self Signed, and CA Signed certificates to a keystore
The keytool binary is found in /opt/vmware/vcloud-director/jre/bin/ but that’s a bit much for typing over and over so create a symbolic link to it in the /usr/bin so that you can simply type “keytool” in the following steps.
That’s it, you’re ready to start get started!
Create a new keystore
The following two commands will accomplish the following:
- Initialize a new keystore with password VMware1!
- Initialize a new private RSA key for an http alias – this will be the primary url used to access the vcd-01a.corp.local server
- Initialize a new private RSA key for a consoleproxy alias – this will be for the console proxy at consoleproxy.corp.local
NOTE: In the following command, the aliases MUST be http and consoleproxy, these are specifically required by the vCloud Director configure application. Be sure to replace “VMware1!” with whatever you wish to use for your keystore password.
NOTE: The path and filename specified for the keystore (/opt/vmware/vcloud-director/certs.ks) can be whatever you like. The configure application will prompt you for the path to the file and the password when you get to the point of configuring or replacing your certificates.
keytool -keystore /opt/vmware/vcloud-director/certs.ks -storetype JCEKS -storepass VMware1! -genkey -keyalg RSA -keysize 2048 -alias http
keytool -keystore /opt/vmware/vcloud-director/certs.ks -storetype JCEKS -storepass VMware1! -genkey -keyalg RSA -keysize 2048 -alias consoleproxy
After each command, you’ll be prompted for the certificate information. The questions are:
- “What is your first and last name?” <- DO NOT enter your first and last name here, instead you must enter the FQDN that the certificate is for.
The remaining questions are less strict so go ahead and answer them accordingly
- What is the name of your organization unit?
- What is the name of your organization?
- What is the name of your City or Locality?
- What is the name of your State or Province?
- What is the two-letter country code for this unit?
Create the CSRs
When creating your CSRs, be sure to specify the load-balanced FQDN of the servers. Replace the bold words with the correct values for your environment:
keytool -certreq -keystore /opt/vmware/vcloud-director/certs.ks -storetype JCEKS -storepass VMware1! -alias http -file /tmp/http.csr -ext "san=dns:vcd-01a.corp.local,dns:vcd-01a,ip:192.168.110.40"
keytool -certreq -keystore /opt/vmware/vcloud-director/certs.ks -storetype JCEKS -storepass VMware1! -alias consoleproxy -file /tmp/consoleproxy.csr -ext "san=dns:consoleproxy.corp.local,dns:consoleproxy,ip:192.168.110.41"
Use CSR to Request Certificate from CA
At this point you now have properly formatted CSR files that include the correct Common Name (set to FQDN) as well as SAN entries for the FQDN, hostname, and IP Address of the respective services. Use your standard process to request certificates from your CA using these CSR files currently found in the /tmp folder.
In my case, I simply use Doug’s HOL-SSL PowerShell module by writing a simple script like this:
create-vcd-01a.ps1:
Import-Module C:\hol\ssl\hol-ssl.psm1
New-HostSslCertificate -HOST_SHORTNAME vcd-01a -HOST_FQDN vcd-01a.corp.local -HOST_IPv4 192.168.110.40
create-consoleproxy.ps1
Import-Module C:\hol\ssl\hol-ssl.psm1
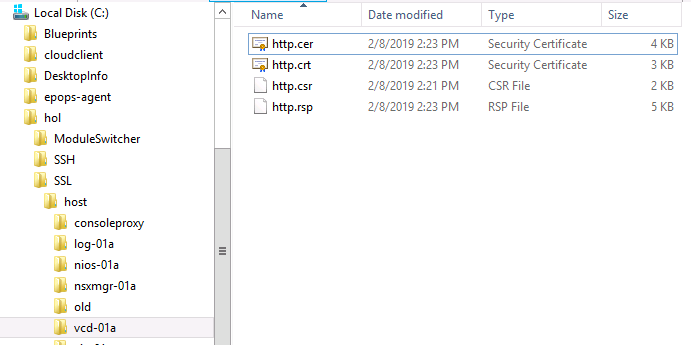
New-HostSslCertificate -HOST_SHORTNAME consoleproxy -HOST_FQDN consoleproxy.corp.local -HOST_IPv4 192.168.110.41Upon execution of those scripts, a new folder with the hostname is created in my ControlCenter under c:\hol\ssl\host\<hostname>
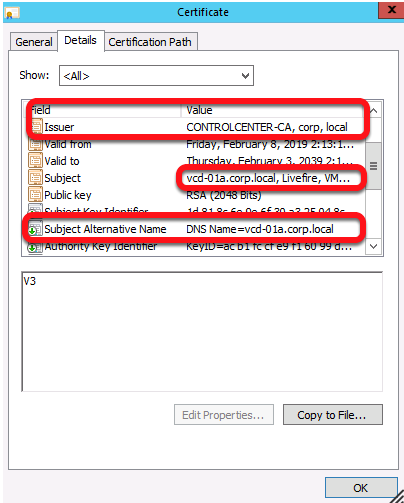
Now that you have the http.cer and consoleproxy.cer files issued by your CA, verify they look good. Note the Issuer is my ControlCenter-CA, the Subject matches my FQDN, and my FQDN is also present in the Subject Alternative Name (SAN)
Now, use WinSCP or similar to copy those files to /tmp on your vCloud Director server. Additionally, copy your Root CA Certificate and any intermediate CA Certificates to /tmp as well.
Import the Certificates
You are now ready to begin importing certificates into the keystore. Perform the imports as follows and in this order:
(NOTE: remember to replace VMware1! with the
1. CA Root Certificate (use alias root):
keytool -storetype JCEKS -storepass VMware1! -keystore /opt/vmware/vcloud-director/certs.ks -import -alias root -file /tmp/CA-Certificate.cer2. Intermediate CA Certificates: (OPTIONAL)
keytool -storetype JCEKS -storepass VMware1! -keystore /opt/vmware/vcloud-director/certs.ks -import -alias intermediate -file /tmp/Intermediate.cer3. HTTP Certificate:
keytool -storetype JCEKS -storepass VMware1! -keystore /opt/vmware/vcloud-director/certs.ks -import -alias http -file /tmp/http.cer4. ConsoleProxy Certificate:
keytool -storetype JCEKS -storepass VMware1! -keystore /opt/vmware/vcloud-director/certs.ks -import -alias consoleproxy -file c/tmp/consoleproxy.cerVerify the Keystore
Confirm http and consoleproxy show as PrivateKey and not TrustedKey and the other certs are imported to the keystore.
keytool -storetype JCEKS -storepass VMware1! -keystore /opt/vmware/vcloud-director/certs.ks -listYou should see an output similar to the following, note that consoleproxy and http should show as PrivateKeyEntry:
Keystore type: JCEKS
Keystore provider: SunJCE
Your keystore contains 3 entries


consoleproxy, Feb 8, 2019, PrivateKeyEntry,
Certificate fingerprint (SHA1): A1:8C:59:CB:6E:A6:00:B2:EE:42:62:53:62:24:BD:9B:99:E9:C0:07
root, Feb 8, 2019, trustedCertEntry,
Certificate fingerprint (SHA1): 1C:11:C7:9C:8D:D1:E7:DC:3B:7F:31:A3:B6:94:AE:43:11:F4:21:AF
http, Feb 8, 2019, PrivateKeyEntry,
Certificate fingerprint (SHA1): 03:88:96:AC:5C:09:A7:B8:F3:F2:CE:D1:A1:FE:A1:92:45:03:E2:A2


Warning:
The JCEKS keystore uses a proprietary format. It is recommended to migrate to PKCS12 which
is an industry standard format using
"keytool -importkeystore -srckeystore /opt/vmware/vcloud-director/certs.ks -destkeystore /opt/vmware/vcloud-director/certs.ks -deststoretype pkcs12".
NOTE: You may disregard the warning
Apply the new Certificates to the Services
You’ve made it….Almost! The keystore is ready, now it’s time to tell vCloud Director to actually use it. If vCloud Director is currently running, perform the following to stop the services:
/opt/vmware/vcloud-director/bin/cell-management-tool cell -u admin -p VMware1! -status/opt/vmware/vcloud-director/bin/cell-management-tool cell -u admin -p VMware1! -quiesce true/opt/vmware/vcloud-director/bin/cell-management-tool cell -u admin -p VMware1! -shutdown You can now launch the configure tool to either re-configure vCloud Director to use the new keystore or perform your initial configuration. In either case, you’ll need to specify the full path the keystore and the password when prompted:
/opt/vmware/vcloud-director/bin/configureOnce you’re done working through the prompts, start the vCloud Director service (if needed):
systemctl enable vmware-vcdsystemctl start vmware-vcdCredits and Resources
- abvirtuallabs.com: Replacing vCloud Director Certificates (Is VERY close to being exactly what is needed, but appears to have been written prior to the Chrome update)
- StackOverflow.com – I found the necessary command line switch here


Thank you so much for the amazing blog, I would definitely like to leave a comment here for the amazing content that you guys shared on this blog.