After you have deployed Kubernetes, it is time to configure – limited – access for your colleagues using Roles and RoleBindings.
In this post I want to discuss how to create a user account in Kubernetes and how to configure role-based access to a subset of objects.
Starting Point
- We have deployed our Kubernetes v1.15.2 using kubeadm.
- Our cluster “kubernetes” has two worker and one master node.
- We can run kubectl commands with admin privileges (user: kubernetes-admin)
- Certificates created by kubeadm are accessible.
- We have openssl and kubectl installed.
Goal
- Create a user “hans”
- He cannot be trusted, so he should have only limited access:
- Play around with pods and configmaps
- Only in the “default” namespace
- We will create a kubeconf for him, so that he can use
kubectlright away.
Workflow Overview
Kubernetes provides a command to create service accounts:
kubectl create serviceaccount <name>but it does not contain an option to create users. In the documentation we can find the following statement:
Normal users are assumed to be managed by an outside, independent service. An admin distributing private keys, a user store like Keystone or Google Accounts, even a file with a list of usernames and passwords. In this regard, Kubernetes does not have objects which represent normal user accounts. Normal users cannot be added to a cluster through an API call.
So we will conduct the following steps:
- Create a key, CSR and eventually a certificate that is signed by the CA that was created by
kubeadmduring the installation - Create a kubeconf file for our user
- Setup a Role and a Rolebinding
Creating the Certificate
We can find the CA files in /etc/kubernetes/pki. Those files were created by kubeadm during the installation process and are protected. So we will run the following commands by root.
ls -l /etc/kubernetes/pki/ca*
 -rw-r--r-- 1 root root 1025 Aug 15 14:36 /etc/kubernetes/pki/ca.crt
 -rw------- 1 root root 1679 Aug 15 14:36 /etc/kubernetes/pki/ca.key
To store all future user certificates and kubeconf files at a central place I suggest to create a users directory in /etc/kubernetes. First we will create a private key for Hans:
openssl genrsa -out hans.key 2048Then create a CSR using the key we created in step one:
openssl req -new -key hans.key -out hans.csr -subj "/CN=hans/O=livefire"The CN defines the username. The O refers to the group he is a member of. If you want to assign Hans to more than one group use: "/CN=hans/O=livefire/O=vmware"
We now have two files in our directory: hans.csr and hans.key
Next create the certificate. We need to refer to the CA files created by kubeadm:
openssl x509 -req -in hans.csr -CA ../pki/ca.crt -CAkey ../pki/ca.key -CAcreateserial -out hans.crt -days 700Note: The command has been run in /etc/kubernetes/users
You can omit the "-CAcreateserial” if you have created other certificates before and/or have a “ca.srl” file in the /etc/kubernetes/pki folder.
We can verify our certificate by running:
openssl x509 -text -noout -in hans.crt | head -20The output should look like:
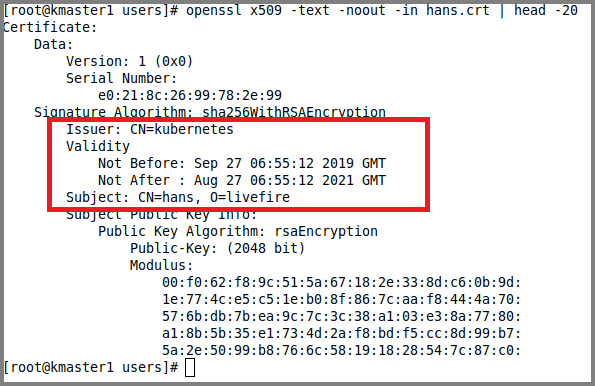
Note the Issuer, Validity and the Subject details.
So, on to the next step:
Setup the kubeconf File
Remember when kubeadm told you to create a .kube directory and copy a file to this directory? See below:
Your Kubernetes control-plane has initialized successfully!
To start using your cluster, you need to run the following as a regular user:

mkdir -p $HOME/.kube
sudo cp -i /etc/kubernetes/admin.conf $HOME/.kube/config
sudo chown $(id -u):$(id -g) $HOME/.kube/config
Basically you copied the kubeconf file that kubeadm created for the user “kubernetes-admin” to your home directory and kubectl use this as the default “context” for your environment.
What is a context?
In Kubernetes a context describes the combination of :
- Cluster
- Namespace
- User
And this is what we create now for our user Hans:
First lets define the cluster. Please run the command as root, as we need to read the ca.crt.
kubectl config --kubeconfig=hans-config --embed-certs=true \
set-cluster kubernetes \
--server=https://<APISERVER-IP>:6443 \
--certificate-authority=../pki/ca.crt
For readability the command is broken down into multiple lines. Explanation below:
- Run
kubectl config, define the kubeconfig file and make sure that the certificates are embedded - We need to define the cluster. In our case the cluster name is “
kubernetes“ - Provide the target IP of the API server. In our case the master node.
- Link to the CA that was used to sign all certificates for this cluster.
Next we set the cluster:
kubectl config --kubeconfig=hans-config --embed-certs=true \
set-credentials hans \
--client-certificate=hans.crt --client-key=hans.key- Same as above
- Set the credentials mapped to this setup
- Provide the user certificate and private key file.
Now lets tie the cluster, the namespace and the user together:
kubectl config --kubeconfig=hans-config \
set-context standard \
--cluster=kubernetes --namespace=default --user=hans- This time we do not need to embed any certificates.
- We set a name for our context.
- Tie the cluster, namespace, user together.
Finally we define the default context for our user:
kubectl config --kubeconfig=hans-config \
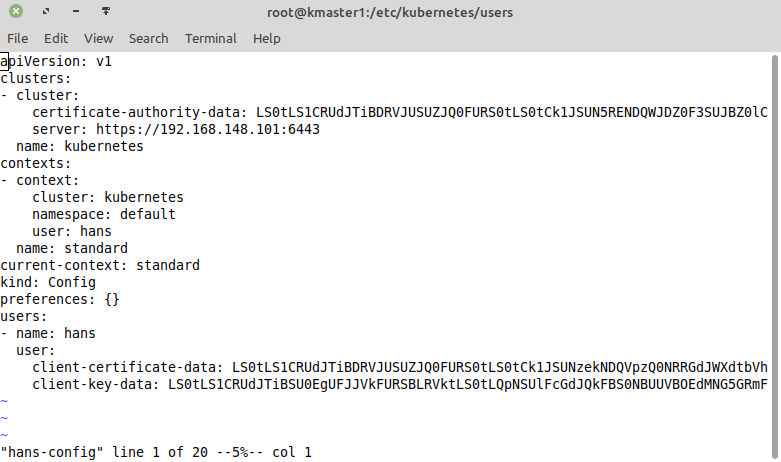
use-context standardSo we have setup our kubeconf file. In my case the file looks like this:
(Note: for readability the lines are cut off at the end):
Create Role and RoleBinding
In the final step we now have to create a role and a rolebinding:
- A role defines what permissions a user has.
Example: view all running pods in a namespace… - A rolebinding simply maps a user to a role.
Note: I intentionally use a very simple setup here. I am planning to write more about RBAC in one of my upcoming posts. For now lets keep it simple…
Please run the following commands as a user with admin privileges on the kubernetes cluster. Which is the user that has the admin-conf file copied to the .kube subdirectory of the home folder.
Here is the yaml file for the role we are about to create for our user Hans:
apiVersion: rbac.authorization.k8s.io/v1
kind: Role
metadata:
  name: roleForHans
  namespace: default
rules:
- apiGroups:
  - ""
  resources:
  - pods
  - configmaps
  verbs:
  - '*'
You can see we will provide him full permissions (verbs: *) to pods and configMaps (resources section) in the namespace default. Copy the text above to a file and apply it using:
kubectl create -f <filename>And in the last step we have to bind the role we created above the our user:
kind: RoleBinding
metadata:
  name: roleBindingForHans
  namespace: default
roleRef:
  apiGroup: rbac.authorization.k8s.io
  kind: Role
  name: roleForHans
subjects:
- apiGroup: rbac.authorization.k8s.io
  kind: User
name: hans Hint: Within a rolebinding you can only refer to one role, but can map multiple subjects to it.
Same procedure as above: Copy the configuration above to a file and apply it using
kubectl create -f <filename>Test our Setup
Now lets see if everything works as expected:
Please note: The commands below are executed with a user account that does not have the .kube directory set up!
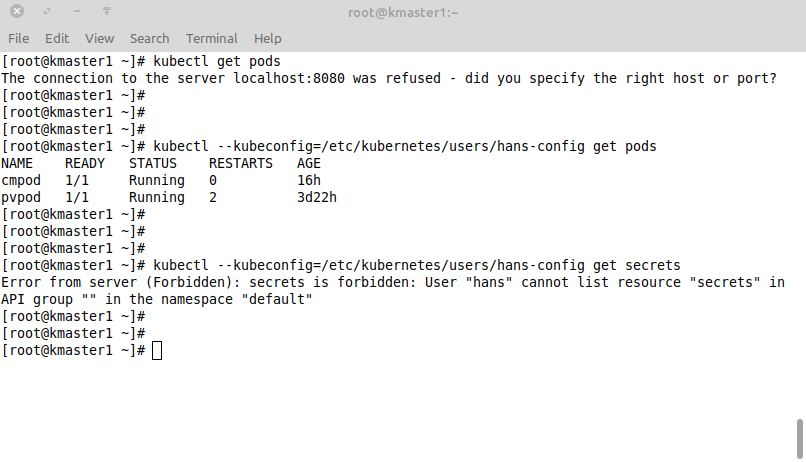
- The first command did not work, because
kubectldid not find any kubeconfig that it could use. - Then I pointed
kubectlto the kubeconfig file we created for our user Hans and we were able to see all the running pods in the default namespace. - Finally I tested if the role is working properly. I cannot see any secrets as we have configured access to pods and configmaps only.
We can now hand out the kubeconf file (hans-config) to our user. He can put it in a folder .kube in his home directory, rename the file to config and then he can run all the kubectl commands he is allowed to.
Just make sure that the file is readable for him… 🙂
No other configuration required! The file contains the CA key, his private and public key, as well as all the information required to connect to our Kubernetes cluster.
Whats Next…?
In an upcoming post I want to discuss the setup of a kubeconf file that contains several contexts. Like one production cluster, one dev cluster, different namespaces and users…
Stay tuned!